How To Install Window 11 Pro on Laptop:
Stay Connect With zabitechs, at Zabitechs Blog We Teachs You How To Install Window Step By Step On Laptop.
I Teach You Step By Step:
- First of all friend's, my laptop is so heavy, and on top of that, it's so slow. Today, we'll properly install Windows, build a rocket—let's go! By the way, friends, speeding up the PC is just an excuse. Actually, my Windows hadn't been updated in a long time, and after that, the 'athakane' scene (meaning it was stuck). Normally, Windows was running, but I had installed so many applications that instead of removing them one by one, it's better to just restore Windows properly.
Recently:
We also got a new SSD (you can see it with the 'i' button), so we had to set that up too. I wasn't able to do it earlier because I had to install Windows. Finally, that day has come, so today we'll properly install Windows—the latest version. I’ll also show you different methods. If you want to do a clean install or something else, we’ll go through all the steps in detail—just stay tuned. If you face any issues, let’s go to the desktop and check it out.
Okay friends, let’s begin:
- First I’ll connect my pen drive—simple. Done, first step completed, very easy process. Now, let it connect. Next
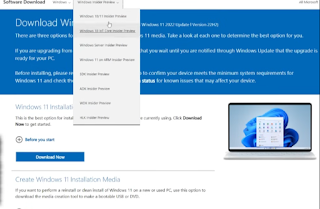
- Simply open any browser and type 'Download Windows 11'—that’s it. You’ll see Microsoft’s official link at the top. Make sure to type '11', otherwise, it might take you to Windows 10, which is more common.
Look: it is at the top—just click it. Now, we’ll land on a page (this might vary). We’ll select Windows 11 and reach this page.
- Here, pay attention: if you want a preview version, you can select 'Insider Preview' but for the stable version, it’s right here. You can directly download the ISO or use the Media Creation Tool, which is great. I’ll select this one.
After downloading the Media Creation Tool:
- double-click it, click 'Yes' in the permissions. The advantage of this tool is that we don’t need to manually download the ISO and then mount it—it handles everything. First, accept the terms and conditions. It’ll prepare some things—just wait.
Now select:
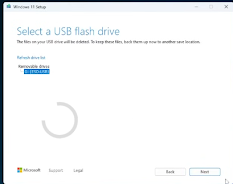
- 'USB Flash Drive' since we’ve connected a pen drive. Click 'Next'—it’ll detect the drive. I’ll select my pen drive (you can see it here). Click 'Next'—it’ll start downloading the ISO and mounting it automatically. You don’t need to do anything—the tool handles everything.
By the way, I’m doing a complete clean install on my PC. If I show you my File Manager, you’ll see multiple drives—some have old Windows installations, some have my current Windows, and others have backups. It’s always good to back up data before a clean install.
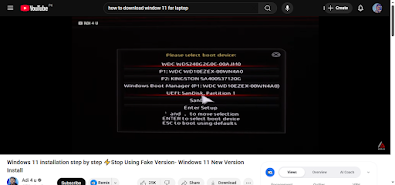
Once the bootable drive is ready, you’ll see a completion message. Now, I’ll restart my PC and enter the BIOS. For this process, you need proper BIOS settings. On my PC, it opens with F12. If you don’t know about BIOS, I have a detailed video on it—you can check that.
In the BIOS, I’ll go to 'Boot Devices' and select my Sandisk pen drive in UEFI mode. The Windows installation will start. First, select the language, then click 'Install Now'. Next, you’ll see the activation window—if you have a key, activate Windows here; otherwise, select 'I don’t have a product key' (you can activate later).
I recommend Windows 11 Pr0:
Okay friends:
- I’ve deleted all partitions. You can see my 931GB HDD, a 120GB SSD, and an M.2 NVMe SSD (256GB). I’ll install Windows on the NVMe drive. The installation takes 2-4 minutes on an SSD, but on an HDD, it might take up to 8 minutes.
Done!
On the first boot:
- You’ll see the Windows 11 setup screen. Select your country (it auto-detects), sign in with a Microsoft ID for the best experience, accept the terms, and customize settings. Once done, Windows will be ready.
- Now, if I show you, only one drive is visible. To see others, go to Disk Management—you’ll see unallocated space. Just allocate it, and all drives will appear.
That’s it! Windows 11 is fully installed. this is the latest method. It works perfectly. .
THANK YOU!


.png)
.png)
0 Comments